Tuesday, March 13, 2012

New Task Manager in Windows 8 Consumer Preview

Browsing to find out what differences Windows 8 Consumer Preview has, i noticed a cool new Task Manager:

New Picture

Nice pictorial view of machine resources and also some network stats.

The processes tab has also been beefed up with a more detailed breakdown:

New Picture (1)

sweet!

Grabbing a file from inside a VHD

Following the post earlier of me configuring a VHD Boot of Windows 8 CP, I had gone in and created some screenshots. Because Windows 7 was still my primary work OS, I had rebooted my machine and went back into my Windows 7. I started to want to post a blogpost then realized the screenshots were in my Windows 8 VHD. How do i get them out?

Step 1: Launch Computer Management

Step 2: Navigate to Disk Management, Right-Click Disk Management, then select Attach VHD

Step 4: Browse to the VHD of choice, in my case was the Win8Beta VHD

Step 5: You should now see it as a listed disk. If you had not already done so, now assign a drive letter to it.

Step 6: You can now browse the files inside it through the drive letter.

Step 7: Go look for the files that you need, in my case, it was in the My Pictures folder in my user profile.

Sunday, March 11, 2012

Setting up Windows 8 Consumer Preview to Boot from VHD

Being in a careful situation, not wanting to mess my Windows 7 and configurations I have done seeing as I would probably need to work.. Smile … I opt to configure Windows 8 to boot from VHD. For some reason, when i tried this in the Developer Preview, I couldn’t get it working. I have Windows 7 running natively, and dual booting with Windows Server 2008 R2 booting from VHD.

I had referred to a couple of blogs for guidance, and one in particular gave me a good reference point on Hyper-V.nu

Here is how i did mine:

Step 1: Download the Windows 8 Consumer Preview ISO

Step 2: Have installed UltraISO or PowerISO. We need this to mount the ISO to copy out the install.wim image

Step 3: Create a directory where you would like to place the VHD file. In my case, I created Z:\VHD\Win8Beta

Step 4: Mount the Windows 8 ISO

Step 5: from the mounted drive, copy the \sources\install.wim to the created directory [e.g. Z:\VHD\Win8Beta]

Step 6: Download the Install-WindowsImage PowerShell script and copy it into the same directory as above

Step 7: Create the VHD using the following steps in Windows 7

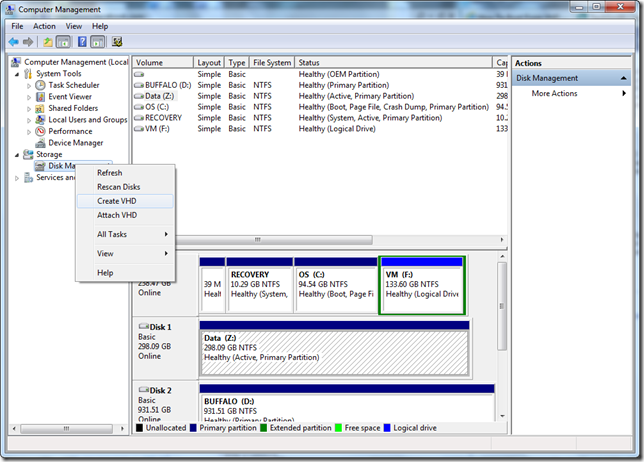
Step 7a: Launch the Computer Management app

Step 7b: Right-click Disk Management and select Create VHD
1

Step 7c: Create the VHD in the directory created earlier with the size of your choice. I wanted to do some performance testing, so I selected Dynamically Expanding for my disk type

2

Step 7d: Once done, from the Disk Management control panel, you should see the created and attached VHD. Proceed to initialize the Disk

4

Step 7e: Next create a Primary partition

5

6

Step 7f: Assign a drive letter so that we can perform the WIM install later. In my case i assigned [M:\]

7

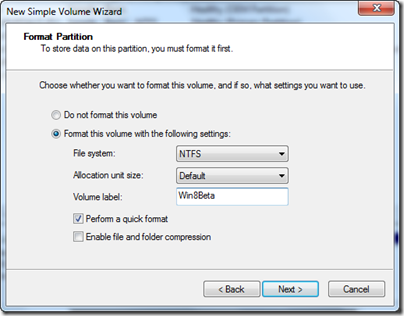
Step 7g: Perform a Quick Format of the drive 
8

Step 7h: You should have an end result of a formatted VHD attached to the drive letter. Once again ensure you have the install.wim, the powershell script, and the created VHD in the directory you created

9

10

Step 8: Apply the WIM Image to the VHD using the PowerShell script

Step 8a: Launch a CommandPrompt run as Administrator

Step 8b: Change to the directory containing the VHD, WIM image and PowerShell script {cd z:\VHD\Win8Beta}

Step 8c: launch powershell {> Powershell}

Step 8d: Run the following powershell commands one by one (replace the drive in the command below with the one you created):

     PS> set-ExecutionPolicy Unrestricted
     PS> .\Install-WindowsImage.ps1 –WIM Z:\VHD\Win8Beta\install.wim
     PS> [R]un once
     PS> .\Install-WindowsImage.ps1 –WIM [drive]:\vhd\install.wim –Apply –Index 1 –Destination W:
     PS> [R}un once

The steps above are shown in this screenshot below:

11

Once done, you should see the Windows 8 system populated in the mounted drive

12

Step 9: Configure the Boot Menu for the VHD to Native Boot

Step 9a: In the Command Prompt window, execute:

     > bcdboot m:\windows

     *in my case, m: was the drive that i used to assign the VHD to.

Step 9b: check your boot entries:

     > bcdedit /v

Below shows a screen shot of Step 9:

14

Step 10: Reboot and configure your sysprepped Windows 8!

You will see the new Boot Menu

WP_000261

Hope these steps are clear enough for you to try it out. And do post comments if you have noticed any errors or it went successfully for you.

Thursday, November 17, 2011

Tech Insights 2011 - Useful FREE WIndows Tools to assist in a Windows 7 Migration

Tech Insights 2011 was awesome... as always. The session that I delivered this year was on sharing Useful Tools to Assist in Assessment, Deployment and Managing a Windows 7 Infrastructure.

Here is the slide deck from my session:


Also.. recorded it if you want to view it:


If the video does not display well, View it in Vimeo

Check out www.techinsights.my for details about the event and announcements for Tech Insights 2012

Saturday, November 12, 2011

SQL 2012 New Licensing scheme under virtualization

Looking at SQL Server licensing today, we could actually save some money based on how it is licensed under a Virtualization scenario. An example is as follows:

SCENARIO: You have a 2 X Quad Core Processor in the Host Server, and had SQL Server installed in a virtual machine. In the Virtual Machine, you assigned 4 Virtual CPUs.

LICENSING CALC: To license the SQL Server on Processor licensing, we would calculate as follows:
                                  
                                   [no. of Virtual CPUs] / [no. of total physical cores] = 4 / 8 = 0.5
                                  
                                   Round up the result to the nearest whole number = 1      
                                  
                                   This means that you would need to license it with 1 Processor License

This is huge savings as you would only need to purchase 1 Proc license even though the Host Server had 2 Processors.


This will change in the upcoming launch of SQL Server 2012.

SQL Server 2012 will have 2 licensing models.

  1. The traditional Server + CAL licensing
  2. The new Core based license
Under this new licensing structure, when purchasing the neccessary license for SQL Server in a Virtual Machine, you would have to purchase it based on the no. of Virtual Cores assigned to the VM. Therefore if you had assigned 4 Cores, then you would have to purchase SQL Server Enterprise 2012 with 4 Cores. Microsoft currently states also that the minimum purchase for Cores type structure is 4 Cores.

I am waiting on the actual pricing to see how this plays out on a costing play field. Then we can make our conclusions on how this will affect Virtualization based SQL installations.

Here is the official Microsoft site: http://www.microsoft.com/sqlserver/en/us/future-editions/sql2012-licensing.aspx

Tuesday, October 18, 2011

Windows Intune v2 Released with new stuff

Windows Intune v2 released today with some long needed additions for decent pc management.

Standard features such as inventory, forefront protection, monitoring and alerting were present and added the following:

1. Software Deployment

Intune now has the ability to deploy software from the cloud to any managed PC. You will first have to upload the neccessary software to the cloud service and the space provided is 2GB


Uploading is simple, just click on the link provided and the wizard will request for the location of the file


Some new reports are useful relating to Licensing. If you upload your Microsoft Agreement number, Intune will capture all the neccessary purchase records and report to you in Intune for you to compare with the installed software


Other subtle features are, the ability to execute remote tasks such as Run a Malware Scan, Reboot the machine AND ability to perform basic hardware reporting customizations

Check out Windows Intune:

Monday, August 29, 2011

Tech Ed NZ: Managing IT as a Service

THe second topic that we presented at Tech Ed New Zealand.

Covered how to use solutions such as Operations Manager, Service Manager, Orchestrator and the upcoming VMM2012 to assist in Private Cloud deployments and managing infrastructures that will be providing IT services

Check it out: http://www.ms4u.info/2011/08/microsoft-tech-ed-new-zealand-2011_4418.html

Tech Ed New Zealand: What's Coming in VMM 2012

Presented the upcoming features of VMM 2012 at Tech Ed New Zealand 2011 with my colleague Lai Yoong Seng.

Covered Deployment and Infrastructure changes, Fabric Management, Cloud Management and Services Management.

Check it out: http://www.ms4u.info/2011/08/microsoft-tech-ed-new-zealand-2011_26.html